


It was really only a matter of time before I took on the challenge of painting a watercolour tiger as they are one of my favourite animals. Today, I thought I’d share the step-by-step process of how I created my painting.
Read on if you want to learn how I painted this watercolour tiger. And, if you like him, I have prints and cards of him available in my shop.
Materials Used For Painting a Watercolour tiger
[This section contains affiliate links]
I painted this tiger on 9 x 12.5″ 300gsm hot-pressed watercolour paper and my palette was made up of the following Daniel Smith colours:
- Moonglow
- Bloodstone Genuine
- Sodalite Genuine
- Permanent Alizarin Crimson (avoid alizarin crimson paints with the true pigment PR83 as this is a fugitive colour)
- Quinacridone Gold
- Raw Sienna
- Burnt Sienna
- Sepia
- Carbazole Violet
- Cobalt blue
- Indigo
- Ultramarine Blue
- Hooker’s Green
Additionally, I used masking fluid, white gouache and a white gel pen.
Step 1: Sketching the Tiger & Applying Masking Fluid
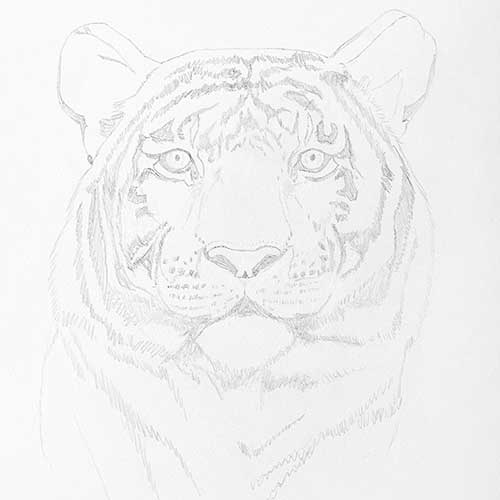
Before I started my painting, I sketched the tiger on my iPad using the app Procreate. The sketch is more detailed than what I usually do but I wanted to make sure I knew exactly where the different colours of fur should go!
Once I was happy with my sketch, I printed it out and transferred it onto my watercolour paper.
There are a few different ways you can transfer your sketch to watercolour paper. On this occasion, I used my lightbox to trace the image.
Stretching My Paper
Next, I stretched my watercolour paper by soaking it in water for around 5 minutes and stapling it onto a piece of gatorboard.
Stretching watercolour paper ensures that the paper will not buckle and it provides a smooth painting surface. Most often, I use gummed tape to attach the paper to the gatorboard but I experimented with staples this time and it worked out fine.
The paper then needed to be left to dry overnight.
Applying Masking FLuid
The following day I was ready to begin my watercolour tiger painting.
I started by applying masking fluid to areas where I wanted to preserve the white of the paper.
Using an old size 0 rigger brush, I painted the tiger’s whiskers, a few hairs on its chin below the mouth and a few hairs in the ears. I should have also painted the whiskers above the eye but forgot– oops! No problem, though, as I simply added them later on.
When painting whiskers, I quickly moved the brush across the paper in the direction I wanted to the whisker to go. I didn’t overthink this or try to painstakingly paint each individual hair. If I did this they would inevitably end up looking stuck on.
I also used masking fluid to preserve a highlight in each eye. Also, the white area directly under the eyes as this is an important, defining shape for a tiger and I wanted to protect it.
When using masking fluid you want to use an old brush as it will eventually wreck it. A tip is to also swirl your brush in some soap before dipping it in the masking fluid as this helps to protects it.
Always wash your brush out when you are finished.
Step 2: Adding the first layer of shadows To my Watercolour Tiger
My preference is to start a painting by first putting down some shadow colours. Initially, I keep these light by using watered down mixes of paint as I can always come back and deepen the shadows if I need to. With watercolour, you want to work light to dark.
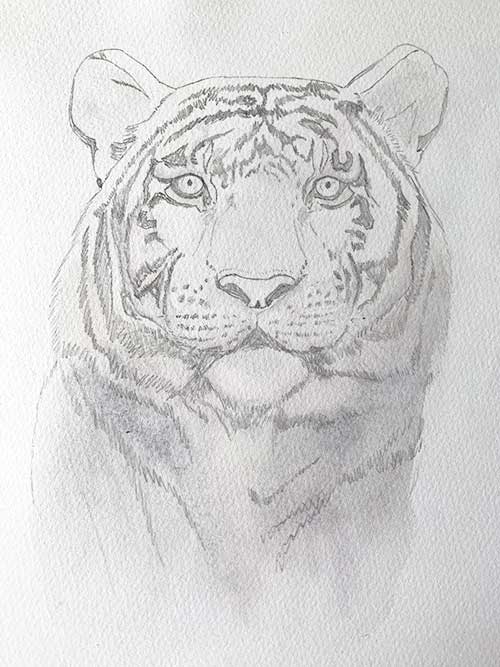
Opting to use a mix of Moonglow and Sodalite genuine for cool shadows, plus Alizarin crimson for warm shadows, I popped shadow colours in all the areas of the painting with white fur that I had first dampened with water.
As I was using watered down paint and the wet-in-wet technique, I was careful to remove excess water from my brush so I didn’t get any puddles of paint.
I am trying to play around with colour theory and use a mix of warm and cool shadows to (hopefully) add depth to my paintings. I am no colour theory expert but have learned that cool colours send areas back and warm colours bring them forward.
After I painted the shadows, I erased the guidelines I drew in pencil on the muzzle to indicate where the white fur began.
Throughout the painting process, I erased obvious pencil lines when I no longer needed them.
Step 3: the Initial Wash of yellow
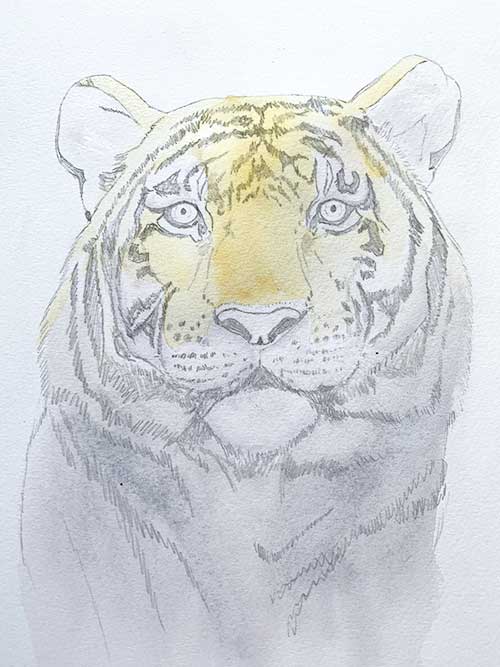
Next, I painted an initial wash, which was a mix of Quinacridone Gold and Raw Sienna. Then, I allowed this layer to dry fully.
Step 4: Second Wash of colour
Working wet-in-wet, I used raw sienna plus a mix of burnt sienna and violet to begin deepening the colours in the middle of the tiger’s face.
For the shadows under the corner of the eyes, I applied a mix of sepia and burnt sienna. Then– while the paint was still wet– dropped some indigo into the darkest part of the shadow.
However, at this point, I realised I was being far too conservative with my use of colour. I like to build my colour by using transparent layers but I knew I needed to be much bolder.
Step 5: Being Bold WIth colour
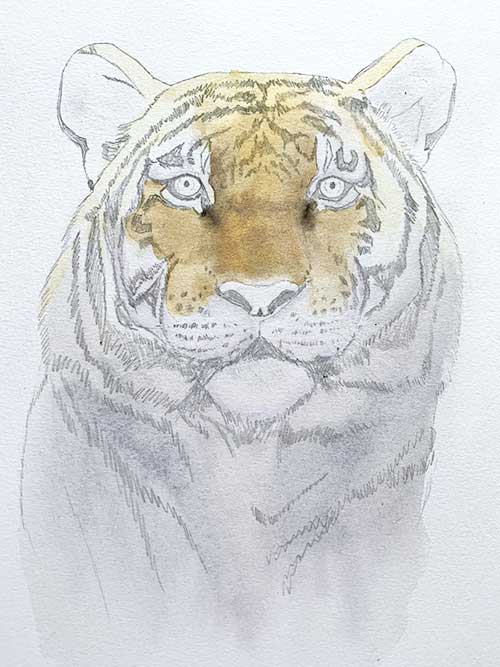
I went over the same area I just painted, but this time I was much bolder with the colour! I used raw sienna, burnt sienna and bronzite genuine pretty much straight from the palette. Bronzite genuine is a gorgeous honey-bronze colour that shimmers in the sunlight.
I also darkened the shadows around the nose by using a mix of sepia, ultramarine and alizarin crimson.
Once this layer had dried, I glazed over it with a watery mix of violet to tone the colour down as it was looking too intense.

Step 6: painting the eyes and ears
Painting the Ears
Next, I worked on the tiger’s ears.
I painted bronzite genuine on the tops of the ears, over the base yellow colour I painted in step 3. Once this had dried, I added some more depth using a mix of raw sienna and burnt sienna.
I defined the inner ear using a mix of ultramarine and sepia. I initially painted this very light, then darkened the colour of the recessed areas of the ear using a thicker mix of paint.
Purposely, I decided to keep the value of the ears lighter than the focal point of the painting. The idea being I wanted to draw the eye toward the middle of the tiger’s face.
Had I painted the ears darker, it would be distracting.
Painting the Eyes
For the eyes, I first painted on a mix of burnt umber and Quinacridone gold. While that paint was wet, I dropped in burnt sienna around the edges.
I then mixed a touch of Hooker’s green into the burnt umber/Quinacridone gold mix and added that to the centre of the eye. At the bottom of the eye, I also dropped in some Quinacridone gold straight from the palette.
Once this layer had dried, I added the shadow that the eyelids/eyebrows were casting over the top of the eye using Moonglow.
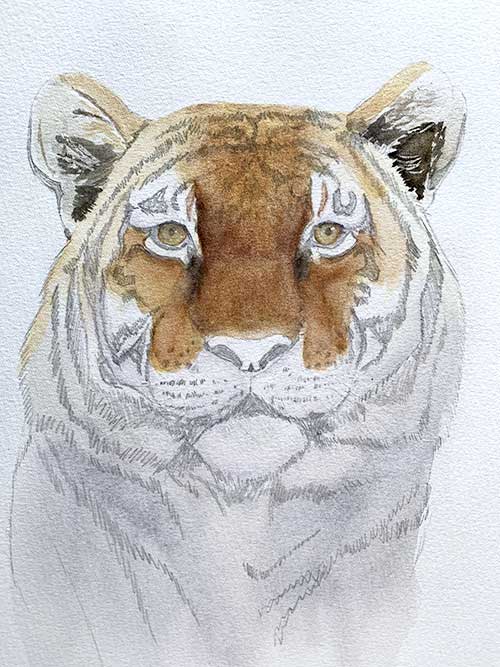
Step 7: Adding Definition around the eyes and painting the nose
For the pupils, I mixed ultramarine and sepia to a thick toothpaste-like consistency. I also used this mix to paint the markings around the eye (I removed the masking fluid underneath the eyes before doing this).
I then painted the first layer of colour on the tiger’s nose. This was a mix of Alizarin crimson and Quinacridone gold.
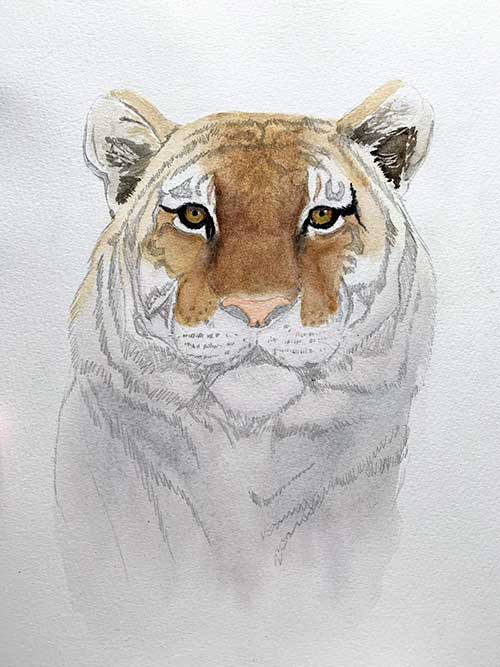
Step 8: Defining the nose, Painting the mouth & stripes
Once the initial layer of paint had dried, I added some subtle shadows around the outside of the nose using violet.
I allowed this to dry before painting the nostrils using a dark mix of sepia, ultramarine and indigo in the deepest part. As I moved outwards, I warmed the colour slightly by adding Alizarin crimson.
This is also how I painted the tiger’s mouth, but I flicked the brush into the areas of white to create a fur texture.
Taking most of the colour out of my brush using a towel, I then added some spots to the tiger’s nose and softened them with a damp brush.
Next, it was time to start painting the stripes!
These were painted with a mix of moonglow and sodalite genuine; with the colour being most intense in the centre of the face then fading away. I also added some ultramarine and violet to my paint mix as I moved outwards.
I painted the stripes using quick, glancing brush strokes to add texture. And, I occasionally dropped some water into the stripes further away from the face to break them up and add interest.
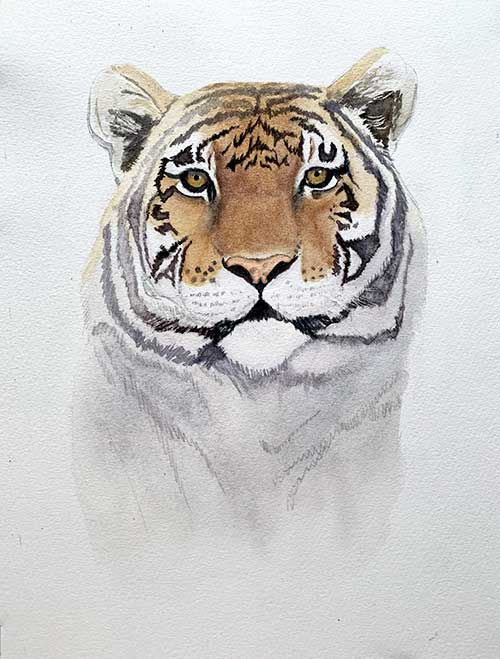
Step 9: Final Touches
At this point, I erased any remaining pencil lines I didn’t want to keep and touched up some areas I wasn’t happy with.
I then stepped away and came back to see what I needed to do to finish the painting.
I added some more cobalt and bronzite to the tiger’s neck/chest area. Then I suggested stripes on the chest by painting them loosely using a watered down mix of the same colour as before (the moonglow/sodalite genuine mix that was still on my palette).
Tigers have bold stripes that continue down to their chest but I kept these stripes purposely light and undefined. I wanted to hint that the stripes are there but didn’t want to distract the eye.
I felt some of the white areas were too white (white fur rarely looks pure white), so I painted a very watery mix of bronzite genuine onto them to tone them down.
And, since I had forgotten about the whiskers above the tiger’s eyes when I applied masking fluid, I painted these on using white gouache. I also used a white gel pen to add some additional highlights to the eyes.
The final step was to splatter some bronzite genuine either side of the tiger (I covered the painting with a piece of paper as I did this). And, he was finished!
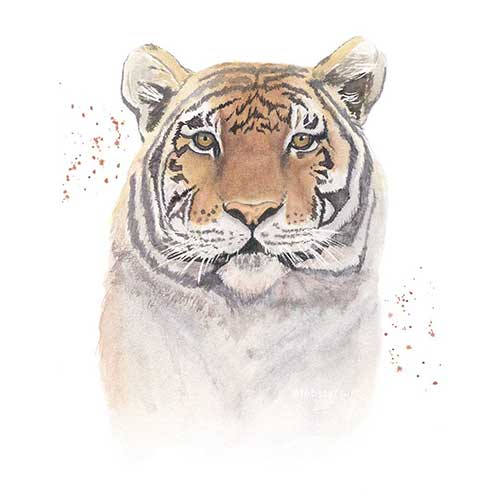
I felt my watercolour tiger needed a regal name so I called him Emyr, which I believe is a name of Welsh origin that means king.
I couldn’t bear to part with the original painting. However, I have added prints and greeting cards of Emyr to my shop. Purchase them below or visit my shop.
I hope you have enjoyed reading about how I painted a watercolour tiger and I’d love to hear your thoughts in the comments.
Share on Pinterest: